Hello and Happy Valentine's Day! Today I have another recycle with me project here and over on my YouTube channel with a video. It's #4 in the series over on YouTube.
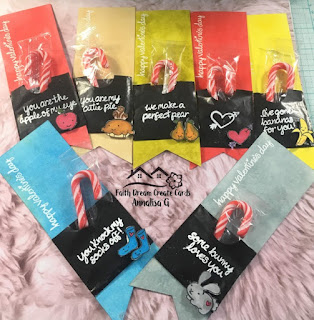
So today's project is not a card but a valentine treat bookmark. For the bookmark I used My Favorite Things Fishtail Flags Layers STAX Die-namics. ( This set is discontinued, but I will link to a similar set from MFT & also Simon Says Stamp) I used the big shot machine to cut those out.
For these super cute images and sentiments I used Lawn Fawn's stamp set my silly valentine. I colored the images with spetrum noir markers. I used the browns, yellows, reds, cool greys, and turquoise markers
For the recycled part of my card I used the sleeves the chocolate comes in from after eight chocolates to create a little pocket for a valentine candy treat.
I used Simon Says Stamp clear embossing ink to ink up the sentiments on each little black pocket from the after eight chocolates. Then used white embossing powder and melted it with the marvey heat tool. I used Simon Says Stamp white embossing powder, ranger white embossing powder and Micheal's Recollections white embossing powder. I filmed this project over a few days and didn't pay attention to what white embossing powder I was using so I ended up using all of them. I also used the anti static pouch on the chocolate sleeve to prepare the surface for embossing.
Next I stamped the Happy Valentine's Day sentiment on the bookmark piece in Simon Says Stamp clear embossing ink and used the white embossing powder and the heat tool again. Then I used various colors of distress inks on the bookmarks to add some color there. I used tea dye, mustard seed, candied apple, crushed olive, salty ocean and weathered wood distress inks. I used the ranger blending tools to add the color.
Lastly I was ready to adhere everything together. I adhered the chocolate sleeves to the bookmark using the scotch advanced tape glider. I used foam tape to adhere the little images to their corresponding sleeve that matched the sentiments. Then I added some candy canes to the pocket as I had them on hand and leftover from Christmas. You could include any little candies that fit.
You could also make your own mini pouches/envelopes for this project. Or maybe you have some mini envelopes in your collection that you can finally find a use for.

Thanks so much for stopping by my blog today. Have a great Valentine's Day!

Affiliate Link
Disclosure: I participate in various affiliate programs. That means I receive a
small commission, at no additional cost to you, when you purchase products
through links I provide here on YouTube and my blog. By participating in
affiliate programs I am able to generate income by sharing links to the
products I love. I only share product info for things I love and use in my
projects. If I don't love it I won't endorse it here. I'm a proud affiliate of
Scrapbook.com, amazon associates and Simon says stamp.
Comments